Venue - Product page - Link to sibling products using images or swatches
From Venue 18.0.0 onwards you can link related but separate products together using the Sibling products block on the product page. These links can be shown as image thumbnails or standard swatches, giving the appearance of selecting a variant/option swatch when in fact the customer is taken to a new product page - i.e a sibling of the original product.
One of the benefits of this feature is that you can display variants as individual products on collection pages but link them together like classic variants of a single product on the product page.

Shopify offers a similar but different feature called Combined listings, but this is only available for Shopify Plus merchants at the time of writing. Venue 18.1.0 onwards is fully compatible with combined listings, although the sibling products block can provide a flexible, free, alternative.
Set up your products in the admin
For this feature to work, each option you want to display as a swatch (for example, color) must be created as a separate product in your Shopify admin. Within each product, you can still have additional options like size (Small, Medium, Large).
In the example below, each color of the t-shirt is listed as its own product, with size handled as variants inside that product.

Build your list of sibling products (basic)
There's two way to build a sibling list:
- Use the product picker in the theme editor block - as shown in the gif below
- Use a 'product list' metafield - as outlined in the next section below

Tip: Don't forget to add the the current product you are viewing to the list of sibling products.
We strongly recommend the metafield option, since it avoids the need to create a unique product page template for every sibling group. For example, if you build a sibling list for a set of tee shirts in the theme editor, those same tee shirts might appear in unrelated places like footwear or headwear product pages unless you create separate product page templates to prevent it.
With the product list metafield, the sibling list is dynamic and easy to manage directly from the product admin page.
Set up your product list metafield (advanced)
Create the metafield
- In Shopify admin, go to Settings → Metafields and metaobjects → Products.
- Click Add definition.
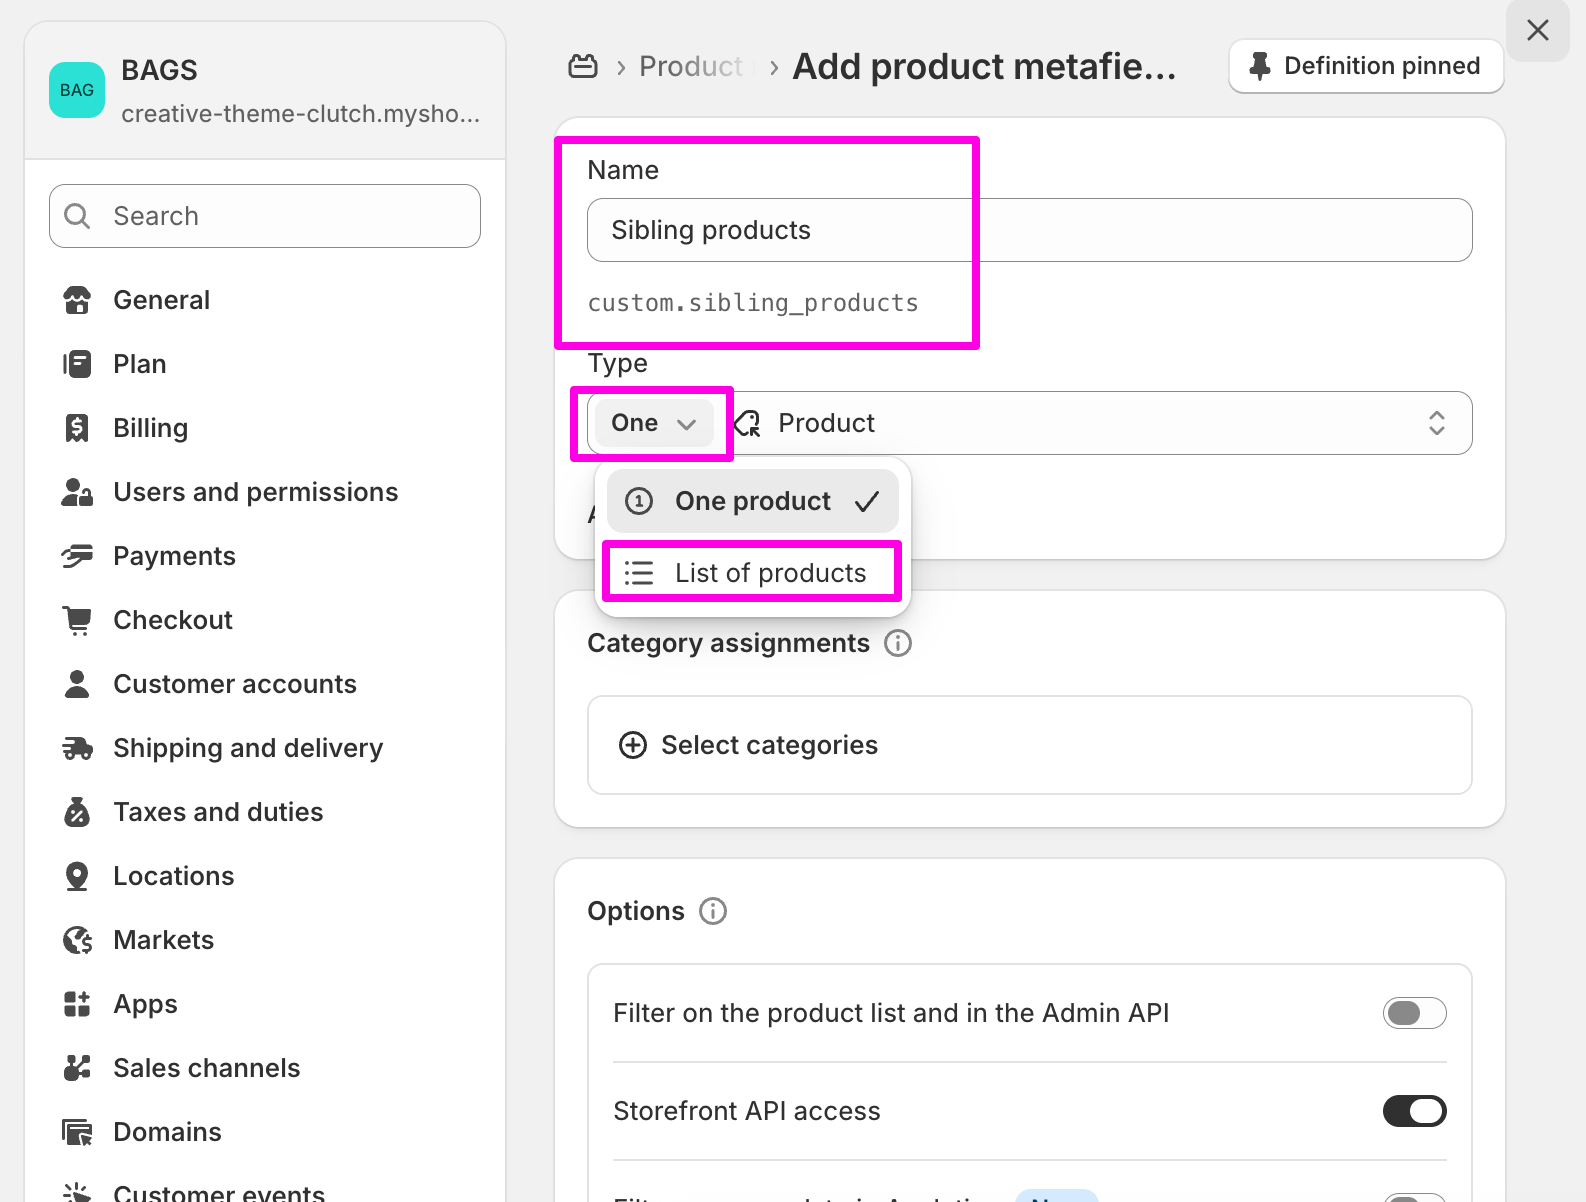
- Name: Type 'Sibling products'.
- The Namespace and key which is directly under the name field should say 'custom.sibling_products' - you can click on this to edit if you need to.
- Type: choose Product and then click the small dropdown to the left of the word 'Product' and change it from 'One' to 'List of products'
- Add a description if you wish to help colleagues who might also edit your store.
- Click Save.
Populate the metafield on products
- Go to Products, open a product.
- Scroll down to Product metafields.
- Find the Sibling products metafield you just created and click the Select products button.
- Add the related products (the ones you want to show as swatches/thumbs).
-
Click Save.
(Repeat for each and every product in the sibling group. Don't forget to add the product you are currently editing to the list of siblings)


Connect it in the theme editor block
- Open Online Store → Customize
- Navigate to a Product template using the dropdown at the top of the editor. Ideally one of the products you have just added a sibling list to.
- Click the Product page section then add the Sibling products block (or open an existing one).
- Type the relevant option name you want your customers to see into the heading field (i.e Color)
- Click the small dynamic source icon next to the block’s 'Products' picker and select Sibling products (or whatever your newly created metafield is called).
- Change the size/shape of the image thumbnail if you wish.
- Save.

Tip: Keep the same order of siblings across products for a consistent experience. i.e pink is always the last sibling. This upholds the feeling of clicking variant options.
Display classic swatches instead of image thumbnails
If you prefer to show classic 'color chip' swatches rather than image thumbnails in the sibling products block, you can do so by creating your own swatch data.
This is slightly more advanced, because unlike variants, many standalone product types don’t automatically have hex codes or color labels for the sibling block to hook onto. You’ll need to add them manually.
Requirements
- Create a metaobject with three fields:
- Label (e.g. Navy, Coral)
- Color (hex code)
- Image (optional override image for the swatch)
- Connect that metaobject to a product metafield.
- Populate the swatch data for each product in the admin.
- In the theme editor, make sure the Sibling products block is set to Swatches.
This setup allows the sibling block to render swatches that look and behave like classic color chips, while still linking out to separate sibling products.
Create the Metaobject
- Go to Settings → Metafields and metaobjects → Metaobjects in the Shopify admin.
- Click Add definition.
- Name: Sibling product swatch
- Shopify will automatically create the namespace and key: sibling_product_swatch.
Add Fields to the Metaobject
For each field, add it with the EXACT name and type below:
- Label
- Type: Single line text
- Field name: Label
- Namespace & key: sibling_product_swatch.label
- Color
- Type: Color
- Field name: Color
- Namespace & key: sibling_product_swatch.color
- Image
- Type: File
- Field name: Image
- Namespace & key: sibling_product_swatch.image
Save the metaobject.

Create a Product Metafield reference
- Go to Settings → Metafields and metaobjects → Products.
- Click Add definition.
- Name: Sibling product swatch
- Namespace & key: custom.sibling_product_swatch
- Type: Metaobject
- Reference dropdown → Sibling product swatch (allowing you to link to the metaobject you just created).

Populate the Data
- Open a product in the Products section of the admin.
- Scroll to Product metafields.
- Find Sibling product swatch.
- Click Add entry, then fill in the Label, Color, and Image (optional) fields.
- Save.
- Repeat for each product in the sibling group.

Set up the Sibling block correctly
- In the theme editor, make sure the Sibling products block is set to display Swatch.
- You can change the size and shape of the classic swatches in Theme settings → Swatches

Notes:
- The Label field is needed so your customer can read in text what color or option they have selected when viewing the product page (i.e 'Hot Pink').
- The Image picker can be used for when you might want to display classic swatches but have a striped or camouflage material and can only express this with an image rather than a single color hex code.
Display label names when using images
From Venue 18.0.0 onwards, when you hover over a thumbnail image in the Sibling products block, the label (for example, the color name) will appear. This is especially useful for shoppers when two options look visually similar, such as Black and Navy.
Because the Sibling products block links to standalone products rather than variant options, Shopify doesn’t automatically provide a label field. That means you’ll need to add labels manually so they display alongside your images. In the example below, the Pink tee is missing a label because no data has been added in the admin.

Workaround
To add labels for image-based sibling products, use the same setup described earlier in this guide for classic swatches:
- Create a metaobject and metafield if you haven’t already (with fields for Label, Color, and Image).
- In your product admin, open the sibling product (e.g. the Pink tee).
- Scroll to the metafield section, look for the Sibling product swatch metafield and enter a value in the Label field (e.g. 'Coral').
- Save your changes.
You only need to fill out the Label field when you’re using image thumbnails. The Color and Image fields are not required in this case - as you are using thumbnails. Once saved, the Sibling products block will display the label text as you hover over each image, giving customers a clearer shopping experience.
